Week 1, Day 3 (Introduction to Image Processing in Python)
Welcome to final day (Week 1) of the McE-51069 course. We will introduce Image Processing techniques that can be utilized in various research problems and share you necessary lectures and assignment notebooks.
Notebooks and Assignments
Please download all the lectures and assignment notebooks of week1 (Day 3) here. We have also posted a guide video on downloading and accessing materials on youtube channel.
The Basics
Arrays Creation
First, we will have to import numpy library. In python, it is
import numpy as np
Here, np is a convention that abbreviates numpy. So that, later in the program, we just need to type np to call numpy library.
There are many ways to create a numpy array. First, let's create an array from list.
array = np.array(list)
# import numpy library
import numpy as np

list_object = [[1, 2, 3, 4, 5],
               [6, 7, 8, 9, 10]]

# Let's Create an array
array = np.array(list_object)

# Print Out the Array
print(list_object)
print(array)
print(type(array))
In the list, printing the object separates each element with a comma whilst in an array, it separates each one with space.
The Attributes for ndarray:
# The attributes in `ndarray`.
# Check dtype of the array
print(array.dtype)

# Check item size (number of Bytes)
print(array.itemsize)

# Check array Size [Number of elements in that array]
print(array.size)

# Check number of axis
print(array.ndim)

# Check shape of array
print(array.shape)

# Check the byte of each element
print(array.nbytes)
We can also create arrays from range. np.arange function is just like range() from python built-in functions.
np.arange([start,] stop[, step,], dtype=None)
The square bracket '[ ]' here means it is the optional argument and it has the default value set up. If we do not specify the value, it will take the default value.
e.g. the default value for start argument is 0.
# Let's create another array with function

array = np.arange(20)
print(array)

array = np.arange(2, 20, 2)
print(array)

# start and stop same
array = np.arange(2, 2, 2)
print(array)

# Reverse
array = np.arange(40, 20, -2)
print(array)

# Float points
array = np.arange(0, 2, 0.3)
print(array)
But, with np.arange, we could not control the numbers of element in that array. But with np.linspace, it can be achieved.
array = np.linspace(start, stop, num=50)
Here, the num is set to default with 50, but we could alos specify the numbers of element that we want between the range.
# Create with the count of array wanted
array = np.linspace(0, 2, 5)
print(array)

# reverse
array = np.linspace(20, 2, 20)
print(array.shape)
print(array)

# start and end same
array = np.linspace(20, 20, 5)
print(array)
We can also initialize arrays by just describing the shape of the array that we want.
zeros = np.zeros(shape, dtype, order='C')
ones = np.ones(shape, dtype, order='C')
empty = np.empty(shape, dtype, order='C')
# Initialize array for place holder
array = np.zeros((5,5))
print(array)
print(array.dtype)
The default data type, when creating such array, is float64. But if we want to specify the data type of the array, we can do it as follows:
import numpy as np
# Set data type to `uint8`
array = np.zeros((3,3), dtype=np.uint8)
print(array)
print(array.dtype)
np.ones() and np.empty() also initialize arrays like np.zeros(), but with different values.
array = np.ones((5,5))
print(array)

array = np.empty((5,5))
print(array)
We can also create arrays from the existing list and set object by using np.array() function. Numpy can automatically choose the data type and set the data type for the array as either int64 or float64.
# Create with existing Variable
nested_list = [[1, 2, 3], [4, 5, 6]]
nested_array = np.array(nested_list)

print(nested_list, '\n', nested_array)
print(nested_array.dtype)


nested_set = ((1, 2, 3), (4, 5, 6))
nested_array = np.array(nested_set)
print(nested_set, '\n', nested_array)
print(nested_array.dtype)

# If we take in Float value, the array will recognize it as float64.
list_var = [1., 2., 3.]
array = np.array(list_var)

print(type(list_var[0]), array.dtype)
print(list_var, array)

# But we can also specify the data type in `dtype` argument.
list_var = [1., 2., 3.]
array = np.array(list_var, dtype=np.uint8)

print(type(list_var[0]), array.dtype)
print(list_var, array)
# Simple Arithmetic Operations
array_a = np.array([1, 2, 3])
array_b = np.array([4, 5, 6])

print("Addition of two array : \t", array_a + array_b)
print("Subtraction of two array : \t", array_a - array_b)
print("Multiplication of two array : \t", array_a * array_b)
print("Division of two array : \t", array_a / array_b)
There are also many scientific functions built-in in numpy. These functions are called universal functions.
x = np.linspace(1, 5, 20)

sine_array = np.sin(x)
cos_array = np.cos(x)
exp_array = np.exp(x)
log_array = np.log(x)
The random function in Numpy is also strong. It has the collection of various random distributons built in, including: Uniform Distribution, Standard Normal Distribution and Gaussian Distribution.
# Uniform Distribution
uniform_dist = np.random.rand(100)
print(uniform_dist.shape)

# Standard Normal Distribution
standard_normal_dist = np.random.randn(100)
print(standard_normal_dist.shape)

# Gaussian Distribution
gaussian_dist = np.random.normal(1, 2, 100)
print(gaussian_dist.shape)
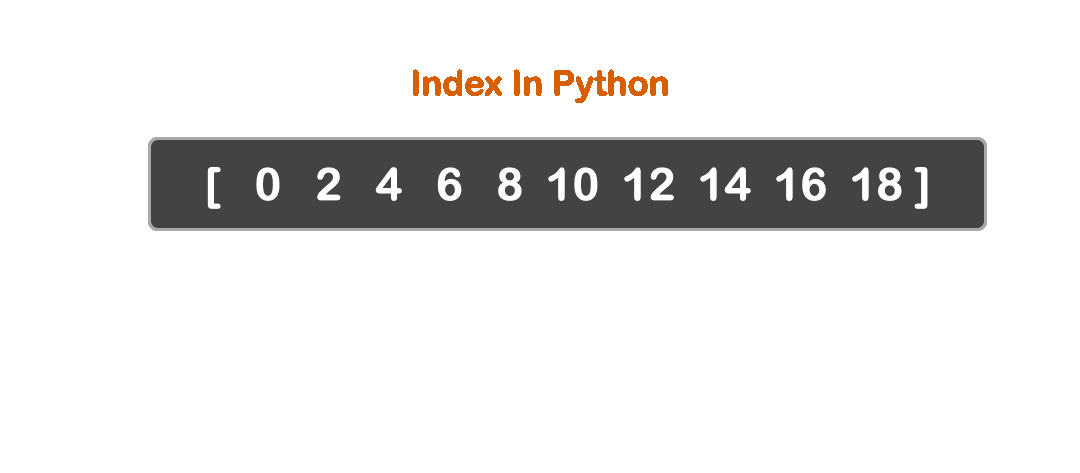
a = np.arange(0, 20, 2)
print(a)

# Index : Select sepecific element
element = a[1]
print(element)

# Slicing : Select Range of element
range_element = a[1:5]
print(range_element)

# Reverse Slicing
reverse_element = a[8:2:-1]
print(reverse_element)

# Iteration
for i in a:
    print(i, end=' ')
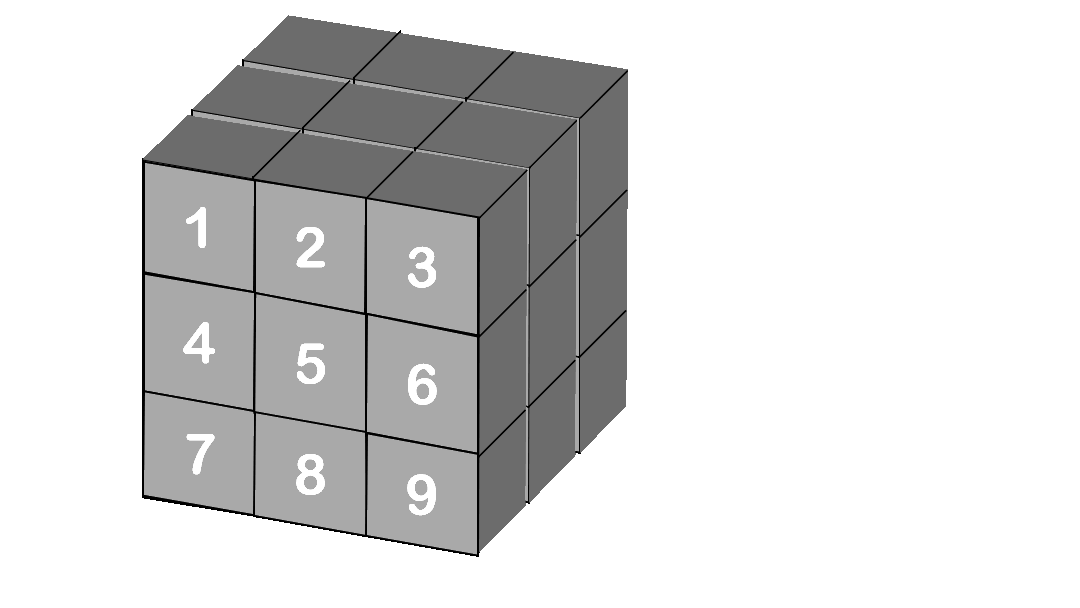
# 2D array
array = np.array([[1, 2, 3], [4, 5, 6]])
print(array.shape)
print(array)

# Indexing
first_element = array[0, 0]
last_element = array[-1, -1]
print(first_element, last_element)

# Range
print(array)
first_row = array[0, :]
last_column = array[:, -1]
print(first_row, last_column)
# 3D array
array = np.array([[[1, 2, 3], [4, 5, 6]],
                  [[7, 8, 9], [10, 11, 12]],
                  [[13, 14, 15], [16, 17, 18]]])

print(array)
print(array.shape)

# Indexing
first_element = array[0, 0, 0] # First_element
last_element = array[2, 1, 2] # Last_element
print(first_element, last_element)

# Range
print(array)
red_channel = array[:, :, 0]
green_channel = array[:, :, 1]
blue_channel = array[:, :, 2]
print()
print(red_channel, green_channel, blue_channel)

array.reshape function is often used to reshape the original array into desired shape.
(3,3) cannot be reshaped into (4,3). It will throw ValueError: cannot reshape array of size 8 into shape (3,3)
Tips:When you are only sure about one dimension for the array, you can use
-1for the rest of array dimensions to let numpy automatically choose the rest.
array = np.zeros((2, 4))
print(array.shape)

reshaped = array.reshape((4, 2))
print(reshaped.shape)

# Here we only know shape for one dimension
unknown_shape = array.reshape((2, -1))
print(unknown_shape.shape)
So the array automatically figures out the rest of the shape in the dimension.
You can use numpy built-in functions to stack arrays. There are three stacking functions dstack, hstack and vstack. Please refer to the above animation for more understanding of stacking arrays.
# This method stack arrays in third axes
dstack = np.dstack((array, array))
print(dstack.shape)

# This method stack arrays in second axes
hstack = np.hstack((array, array))
print(hstack.shape)

# This method stack arrays in first axes
vstack = np.vstack((array, array))
print(vstack.shape)
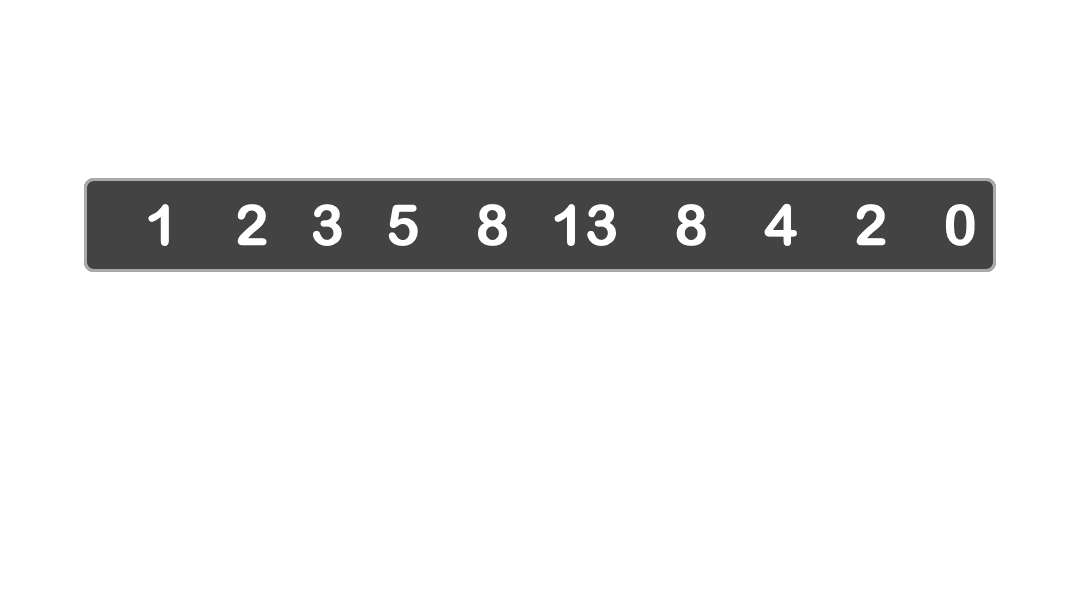
array = np.array([2, 1, 2, 5, 2, 100, 2, 99, 12])

# we can sort the array by
sorted_array = np.sort(array)

# Finding the min, max, argmin, argmax value is easy in numpy by:
min_value = np.min(array)
argmin = np.argmin(array)
max_value = np.max(array)
argmax = np.argmax(array)

print("Original Array : \t\t\t", array)
print("Sorted Array : \t\t\t\t", sorted_array)
print("Minimum value in Array : \t\t", min_value)
print("Index where minimum value exists : \t", argmin)
print("Maximum value in Array : \t\t", max_value)
print("Index where maximum value exists : \t", argmax)
array = np.arange(20)
print(array)

mean = np.mean(array)
std = np.std(array)
var = np.var(array)

print(f"Mean : \t\t\t{mean}\nStandard Deviation : \t{std:.2f}\nVariance : \t\t{var}")
Although the above functions are built-in in numpy library, we can also implement them using equations:
mean = np.sum(array)/array.size
print(mean)

std = np.sqrt(np.sum((array-mean)**2)/array.size)
print(std)

var = np.sum((array-mean)**2)/(array.size-1)
print(var)
# Let's try to compare for large numbers.
array_obj = np.arange(1000000)

print(array_obj.shape)
print(type(array_obj))

# We can convert from ndarray object to list object with
list_obj = [i for i in range(1000000)]
print(len(list_obj))
print(type(list_obj))
list_result = [i+1 for i in list_obj]

# add 1 to array
array_obj = array_obj + 1
The above mentioned is the simplest one, where the dimension is only 1. Let's try with higher dimensions.
# let's create 3d arrays
array_obj = np.arange(100000).reshape(10,10,-1)
print(type(array_obj))

# We could convert array to list by:
list_obj = array_obj.tolist()
print(type(list_obj))

# Add 1: to list
for i in range(len(list_obj)):
    for j in range(len(list_obj[0])):
        for k in range(len(list_obj[0][0])):
            list_obj[i][j][k] += 1

# Add 1: to Array
array_obj += 1
%%timeit
array_obj = np.arange(1000000)
array_obj = array_obj + 1
%%timeit
list_obj = [i for i in range(1000000)]
list_obj = [i+1 for i in range(1000000)]
We can see that doing one operation in creating an array is around 60 times faster than the list in the above comparison. As the size of the element and operations increase more, the difference will go higher.
Further Resources for Numpy
If you wanna know more about Numpy arrays, please visit this official Numpy documentation. You can also learn more about Numpy arrays in this blog post.
Matplotlib is a comprehensive library for creating static, animated, and interactive visualizations in Python. The following plots are referenced from matplotlib's official website For this lecture, we will use matplotlib.pyplot which is a collection of functions that make matplotlib work like MATLAB.
First, we need to know how the pyplot functions work. Let's start with some basic functions.
%matplotlib inline
import matplotlib.pyplot as plt
import numpy as np
x = np.linspace(0, 10, 100)
plt.plot(x,x)

plt.plot(np.arange(8),[0, 1, 2, 3,3.5,4,4.5,5])
plt.xlabel('This is x label')
plt.ylabel('This is y label')
plt.show()

x = np.linspace(0, 10, 100)

fig = plt.figure()
plt.plot(x, np.sin(x), '-')
plt.plot(x, np.cos(x), '--');
plt.title("Sine and Cosine waveforms")
plt.savefig("sine_cos_wave.png")

Here, we have mentioned plt.plot() plt.xlabel(),plt.ylabel() and plt.title(). Let's look at more examples.
x = np.arange(10)
plt.plot(x,x**2,linestyle='dashed',linewidth=2, markersize=12)
plt.xlabel("number")
plt.ylabel("number squared")

Now,we have learnt that additional customizations can be added to the plots with use of some additional arguments. Also, we can make multiple plots on the same plane.
import numpy as np
x = np.arange(10)
plt.plot(x,x**2,x,3*x,'r+',x,7*x,'bo')

x = np.linspace(0, 10, 100)
plt.plot(x, x + 0, '-g')  # solid green
plt.plot(x, x + 1, '--c') # dashed cyan
plt.plot(x, x + 2, '-.k') # dashdot black
plt.plot(x, x + 3, ':r');  # dotted red

Now that we have learnt how to manipulate plt.plot(), this should be enough for the assignments. If you want more information regarding this function, you can check their official documentation and also follow matplotlib's tutorial for this function.
plt.subplot()is a handy function to display multiple plots. Let's dive in and see how it works
x1 = np.linspace(0.0, 5.0)
x2 = np.linspace(0.0, 2.0)

y1 = np.cos(2 * np.pi * x1) * np.exp(-x1)
y2 = np.cos(2 * np.pi * x2)

plt.subplot(2, 1, 1)
plt.plot(x1, y1, 'o-')
plt.title('A tale of 2 subplots')
plt.ylabel('Damped oscillation')

plt.subplot(2, 1, 2)
plt.plot(x2, y2, '.-')
plt.xlabel('time (s)')
plt.ylabel('Undamped')

plt.show()

This is the traditional method to create multiple plots. However, there is an alternative method which is more optimal for creating waveforms.
x1 = np.linspace(0.0, 5.0)
x2 = np.linspace(0.0, 2.0)
x3 = np.linspace(0.0, 5.0)

y1 = np.cos(2 * np.pi * x1) * np.exp(-x1)
y2 = np.cos(2 * np.pi * x2)
y3 = np.sin(2 * np.pi * x3) * np.exp(-x1)

fig, (ax1, ax2, ax3) = plt.subplots(3, 1, figsize=(20,10))
fig.suptitle('A tale of 3 subplots')

ax1.plot(x1, y1, 'o-')
ax1.set_ylabel('Damped oscillation')

ax2.plot(x2, y2, '.-')
ax2.set_xlabel('time (s)')
ax2.set_ylabel('Undamped')

ax3.plot(x3, y3, 'o-')
ax3.set_ylabel('Sine damped')

plt.show()

Form the code above, we now know that subplot function has input and basic output arguments:
figure, axes = plt.subplot(rows,columns,figure_size)
For more details about this function, please follow documentation and reference tutorial from matplotlib.
A scatter plot uses dots to represent values for two different numeric variables. The position of each dot on the horizontal and vertical axis indicates values for an individual data point. Scatter plots are used to observe relationships between variables. Let's start with a simple scatter plot.
x = np.linspace(0, 10, 30)
y = np.sin(x)

plt.plot(x, y, 'o', color='black');

Here, we simply used one of the plotstyles in plt.plot() to create a scatter plot. However, there is a better function for this purpose: plt.scatter()
N = 500
x = np.random.rand(N)
y = np.random.rand(N)
colors = (0,0,0)
area = np.pi*3

# Plot
plt.scatter(x, y, s=area, c="green", alpha=0.5)
plt.title('Scatter plot')
plt.xlabel('x')
plt.ylabel('y')
plt.show()

This should be enough for our course. If you want to learn more about creating different types of scatter plots, please follow this link
The purpose of a Histogram is to graphically summarize the distribution of a single feature within a dataset.
x = np.random.randn(1000)
plt.hist(x, color = "red", edgecolor = "black");
plt.title("Histogram")

plt.hist(x, bins=50, color='steelblue',edgecolor='black');

Histograms are very useful when we make comparisons within datasets. For this example, we have gathered some data from galtron height dataset to compare the heights of 30 men and 30 women.
#Heights of 30 random women in inches
w = [69.2,69,69,65.5,65.5,68,67,64.5,63,66.5,62.5,62.5,69.5,70.5,64,70.5,68,66,66,65.5,68,67,67,66,63.5,63,65,66.7,68.7,62]

#Heights of 30 random men in inches
m = [73.2,73.5,72.5,71,70.5,68.5,72,69,68,76.5,74,73,73,74,70,68,67,71,70.5,72,70.5,70.2,70.2,69.2,74,73,71.5,62.5,73.2,73]

plt.hist(w, bins=10,color='red',edgecolor='black', alpha =0.5)
plt.hist(m, bins=10,color='blue',edgecolor='black', alpha =0.5)
plt.title("Height distributions of Men and Women")

From this Histogram, we can definitely reach a conclusion that men are usually taller than women.
references - matplotlib, python data science handbook
OpenCV (Open Source Computer Vision Library) is an open source computer vision and machine learning software library. OpenCV was built to provide a common infrastructure for computer vision applications.
Before we start, Let's install opencv library in your PC.
!pip install opencv-python
In opencv, we can read and write image files with imread() and imwrite() and display them using imshow()
waitKey(0) waits until any key is pressed and waitKey(milliseconds) waits for a certain amount of time before the window is closed by destroyAllWindows()
%matplotlib inline
import cv2
import numpy as np
import matplotlib.pyplot as plt
import matplotlib.image as mpimg
img = cv2.imread("images/McE_logo.png",1)
# img = cv2.imread("images/McE_logo.jpg",0)
# img = cv2.imread("images/McE_logo.jpg",-1)
# img = cv2.cvtColor(img, cv2.COLOR_BGR2GRAY)
cv2.imshow("Original",img)
cv2.waitKey(0)
# cv2.waitKey(2000)
cv2.destroyAllWindows()
cv2.imread() reads images in BGR but matplotlib displays images in RGB format. Thus, we need to convert formats using cv2.cvtColor(). We can also use this function to convert images to grayscale.
#convert to BGR format for matplotlib
# img = cv2.cvtColor(img, cv2.COLOR_RGB2GRAY)
img = cv2.cvtColor(img, cv2.COLOR_BGR2RGB)
plt.imshow(img)

img = mpimg.imread("images/McE_logo.png")
plt.imshow(img)

img.fill() fills the entire image with particular shade of grayscale.
We could do a bunch of stuff on our imported images. Let's try some functions.
img = cv2.imread("images/McE_logo.png",1)

# cv2.line(image, (x1, y1), (x2, y2), (0, 255, 0), lineThickness)
cv2.line(img, (0, 0), (512, 512), (0, 255, 0), 3, lineType=8, shift=0)

#convert to RGB format for matplotlib
img = cv2.cvtColor(img, cv2.COLOR_BGR2RGB)
plt.imshow(img)

#cv2.rectangle(image, (x1, y1), (x2, y2), (0, 255, 0), lineThickness, LineType , shift)
cv2.rectangle(img, (0,0), (500, 150), (123, 200, 98), 3, lineType=8, shift=1)

plt.imshow(img)

# cv2.circle(img, center, radius, color, thickness=1, lineType)
cv2.circle(img, (300, 300), 70, (0, 0, 255))
plt.imshow(img)

font = cv2.FONT_HERSHEY_DUPLEX
cv2.putText(img, 'McE', (80, 70), font, 3, (0,0,0), 2)
plt.imshow(img)

Thus, after drawing a bunch of beautiful stuff on our images using cv2.line(), cv2.rectangle(), cv2.circle() and cv2.putText(), we might not want our hard work to go waste. Let's try and save the image. using cv2.imwrite()
# cv2.imwrite(path to saved image, img)
img = cv2.cvtColor(img, cv2.COLOR_BGR2RGB)
cv2.imwrite("saved_image.jpg", img)
Image resizing is an important function for machine learning. Most images are needed to be resized to match the model's configurations. It can also serve as an augmentation method. Let's see what cv2.resize() can do.
img = cv2.imread("images/PL-Lion.png")
print(img.shape)
resized_img = cv2.resize(img,(500,500))
print(resized_img.shape)
plt.figure(figsize=(10,10))

plt.subplot(1, 2, 1)
plt.imshow(img)
plt.subplot(1, 2, 2)
plt.imshow(resized_img)

cv2.split() offers a simple way to extract color channels.This is very handy as it offers manipulation to the color channels. As an alternative, we can also slice images.
The channels can be then remerged using cv2.merge().
img=cv2.imread('images/lenaa.jpg')
# b,g,r = cv2.split(img)
b = img[:,:,0]
g = img[:,:,1]
r = img[:,:,2]
hsv = cv2.cvtColor(img,cv2.COLOR_BGR2HSV)
h, s, v = cv2.split(hsv)
print (s)
# s.fill(255)
# print (s)

hsv = cv2.merge((h,s,v))
hsv = cv2.cvtColor(hsv,cv2.COLOR_HSV2RGB)

original = cv2.merge((r,g,b))
mixed = cv2.merge((b,g,r))

stacked= np.hstack((hsv,mixed))
plt.figure(figsize=(8,8))
plt.xticks([]), plt.yticks([]) # remove the ticks
plt.imshow(stacked)

Let's try displaying each channel subplot() instead of stacking
img=cv2.imread('images/lenaa.jpg')

b,g,r = cv2.split(img)

titles = ['Original_Image', 'Blue Channel', 'Green Channel', 'Red Channel']
img = cv2.cvtColor(img, cv2.COLOR_RGB2BGR)
images = [img, b, g, r]

plt.figure(figsize=(10,10))
for i in range(len(titles)):
    plt.subplot(2, 2, i+1)
    plt.imshow (images[i],"gray")
    plt.title(titles[i])
    plt.xticks([]), plt.yticks([])
plt.show()

Images can be translated and rotated with ease using cv2.wrapAffine(img,transformation matrix, resolution). Let's import our lab's logo first:
img = cv2.imread("images/cvml.png")
img = cv2.cvtColor(img, cv2.COLOR_BGR2RGB)
plt.imshow(img)

To use cv2.wrapAffine() we must define our transformation matrix and resolution of the image. If we get our dimensions right, we can translate our image to anywhere on the figure.
h,w,ch = img.shape

M = np.float32([[1,0,100],[0,1,50]])
translated = cv2.warpAffine(img,M,(w,h))
plt.xticks([]), plt.yticks([])
plt.imshow(translated)

For rotational purposes, we could use cv2.getRotationMatrix2d(center,degrees,scale) to calculate our rotation matrix M.
h,w,ch = img.shape
M = cv2.getRotationMatrix2D((w//2, h//2),45, 1)
print(M)
rotated = cv2.warpAffine(img, M, (w, h))
plt.xticks([]), plt.yticks([])
plt.imshow(rotated)

For reflection (flipping) purposes, we can simply use cv2.flip(img,flipCode)to flip the image.
img = cv2.imread("images/MCE_logo.png")
img = cv2.cvtColor(img, cv2.COLOR_BGR2RGB)
flipped = cv2.flip(img,-1)
plt.xticks([]), plt.yticks([])
plt.imshow(flipped)

Edge detection is an image processing technique for finding the boundaries of objects within images. There are several ways to perform edge detection and we will focus on two popular methods for this lecture.
Sobel gradients
Sobel operators uses kernels) to calculate approximations of the derivatives.cv2.Sobel() needs image, kernel size and operating axis as input arguments.
We calculate x direction and y direction gradients first before calculating the magnitude of the sobel gradient. For detailed explaination on sobel gradients, you can follow this link.
img = mpimg.imread('images/McE_logo.png')
img = cv2.cvtColor(img, cv2.COLOR_RGB2GRAY)

sobelx = np.abs(cv2.Sobel(img,5,1,0))
sobely = np.abs(cv2.Sobel(img,5,0,1))

#rescale x and y
sobelx = sobelx/np.max(sobelx)
sobely = sobely/np.max(sobely)

#magnitude of sobel gradient
sobel = np.sqrt(sobelx**2 + sobely**2)

plt.figure(figsize=(10,10))

plt.subplot(2,2,1),plt.imshow(img,cmap = 'gray')
plt.title('Original'), plt.xticks([]), plt.yticks([])
plt.subplot(2,2,2),plt.imshow(sobelx,cmap = 'gray')
plt.title('Sobel X'), plt.xticks([]), plt.yticks([])
plt.subplot(2,2,3),plt.imshow(sobely,cmap = 'gray')
plt.title('Sobel Y'), plt.xticks([]), plt.yticks([])
plt.subplot(2,2,4),plt.imshow(sobel,cmap = 'gray')
plt.title('Sobel'), plt.xticks([]), plt.yticks([])

plt.show()

Canny edge detection
Canny Edge Detection is a popular edge detection algorithm developed by John F. Canny in 1986. cv2.Canny() has three arguments: Input image & min and max values of hysteresis threshold. You can learn more about canny edge detection here.
img = cv2.imread('images/McE_logo.png',0)

edges = cv2.Canny(img,100,200)

plt.figure(figsize=(10,10))

plt.subplot(1,2,1),plt.imshow(img, cmap = 'gray')
plt.title('Original Image'), plt.xticks([]), plt.yticks([])
plt.subplot(1,2,2),plt.imshow(edges, cmap = 'gray')
plt.title('Edge Image'), plt.xticks([]), plt.yticks([])
plt.show()

In 2001, Paul Viola and Michael Jones published a research paper called "Rapid Object Detection using a Boosted Cascade of Simple Features". This paper sets the standards for new generations of face detectors computer vision field and still gets thousands of citations in 2020. Their face detection method is now known as Viola-Jones method.
detectMultiScale() from CascadeClassifier() returns 4 objects, namely, x and y coordinates of the detected face bottom left cornor and width and height of the detected face.
face_cascade = cv2.CascadeClassifier('detectors/haarcascade_frontalface_default.xml')
# img = cv2.imread('images/lenaa.jpg')
img = cv2.imread('images/poster.jpg')

faces = face_cascade.detectMultiScale(img, 1.1, 5)
print(faces)
for (x, y, w, h) in faces:
    cv2.rectangle(img, (x,y), (x+w , y+h), (255, 0, 0), 3)

# cv2.imshow("Detection",img)
# cv2.waitKey(0)
# cv2.destroyAllWindows()
#convert to BGR format for matplotlib
img = cv2.cvtColor(img, cv2.COLOR_RGB2BGR)
plt.imshow(img)
references -Opencv tutorials, Python data science handbook
Photo reference - Lena, Premier League
Further Resources for OpenCV
Please refer to official OpenCV Python tutorials to learn more about image processing techniques using cv2. Also check this awesome opencv tutorials from pyimageserach website.